
How to Milk a Goat by Hand for Beginners: Step-by-Step Instructions
Milking a goat by hand can be a rewarding and straightforward process once you get the hang of it. Whether you’re new to goat keeping or just looking to learn a new skill, this guide will walk you through the basics of hand-milking your goat. With a bit of patience, practice, and the right techniques, you’ll soon be milking like a pro.
Why Hand Milking?
Hand milking is not only a cost-effective method, but it also allows you to bond with your goat. Unlike machine milking, hand milking gives you direct control and ensures a gentler touch, which can be more comfortable for both you and the goat.
Step-by-Step Guide to Hand Milking a Goat
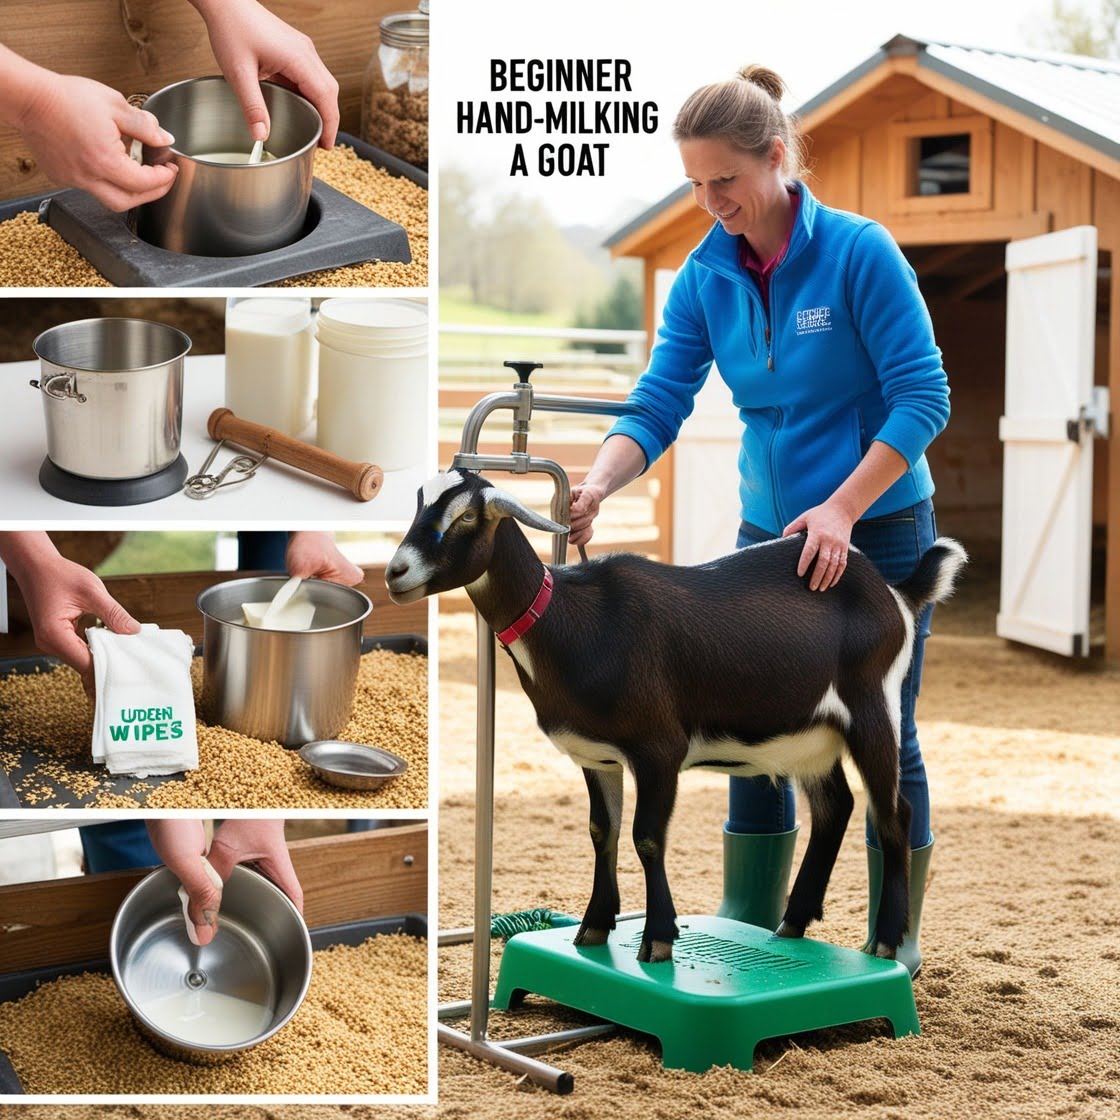
1. Gather Your Supplies
Before starting, make sure you have everything ready. You’ll need:
- A clean milking pail (stainless steel is preferred for easy cleaning).
- A strip cup (for checking milk quality).
- Clean towels or wipes (for udder cleaning).
- A milking stand (optional but makes the process easier).
- Udder balm or lotion (to soothe the udder after milking).
2. Prepare the Goat
- Feed and Secure the Goat: Place your goat on a milking stand and offer some feed to keep her occupied. Securing her properly helps prevent sudden movements that could spill the milk or injure the goat.
- Clean the Udder and Teats: Use a clean, damp cloth to gently wipe the udder and teats, removing any dirt or debris. This step is crucial for maintaining milk hygiene and preventing infections like mastitis.
3. Start with a Strip Test
- What Is It?: The strip test involves squeezing a small amount of milk from each teat into a strip cup before starting the main milking. This helps you check for any signs of abnormal milk (like clots or discoloration) and clears the teat canal.
- How to Do It: Gently squeeze the teat with your thumb and forefinger until a few squirts of milk are released into the strip cup. Examine the milk for any abnormalities. If everything looks normal, you can proceed with milking.
4. Proper Milking Technique
- Hand Positioning: Place your thumb and forefinger at the top of the teat, near the udder. Gently close your fingers around the teat, trapping the milk inside.
- Squeeze and Release: With your thumb and forefinger pinching the teat, use the rest of your fingers to squeeze downward, pushing the milk out. Release the teat and repeat the process rhythmically. Avoid pulling on the teat, as this can cause discomfort and damage.
- Milking Both Teats: Alternate between each teat to maintain a steady flow of milk. It’s essential to fully empty the udder, as leftover milk can lead to health issues.
5. Maintaining a Steady Flow
- Rhythm and Consistency: Aim for a consistent rhythm. Milking should feel like a steady squeeze-release pattern. Over time, you’ll develop your own pace, but keeping it consistent helps the goat stay relaxed.
- Listen to the Goat: If your goat becomes restless, pause and let her settle down. Make sure she remains comfortable throughout the process.
6. Finish Milking and Care for the Goat
- Check for Completeness: Once the milk flow slows to a trickle, check the udder by gently feeling it to ensure it’s empty. Milking out completely helps prevent mastitis.
- Apply Udder Balm: After milking, gently apply udder balm or lotion to the teats to keep them soft and prevent cracking.
7. Strain and Store the Milk
- Strain the Milk: Use a milk strainer or cheesecloth to filter out any impurities before storing the milk. This step ensures that the milk is clean and safe for consumption.
- Proper Storage: Store the milk in clean, airtight containers (glass jars work well) and refrigerate it immediately. Fresh goat milk can last up to a week in the fridge.
Troubleshooting Common Milking Issues
- Goat Kicking or Fidgeting: If your goat is restless, try adjusting her feed, talking to her calmly, or giving her a gentle belly rub. You can also try placing your arm over her hind leg to prevent sudden kicks.
- Low Milk Production: This could be due to stress, diet, or health issues. Ensure your goat has a balanced diet, clean water, and minimal stress during milking.
Final Tips for Beginner Milkers
- Practice Patience: Milking is a skill that improves with time. The first few attempts might feel awkward, but with patience and practice, you’ll get the hang of it.
- Keep Everything Clean: Cleanliness is crucial in milking to prevent contamination. Always sanitize your hands, equipment, and the goat’s udder before and after milking.
- Be Gentle and Consistent: Goats respond best to gentle handling and a consistent routine. Establish a regular milking schedule, as goats thrive on consistency.

Conclusion
Milking a goat by hand is a rewarding experience that connects you with your animal and provides fresh, nutritious milk. By following these step-by-step instructions and maintaining a calm, clean environment, even beginners can master the art of hand milking. With practice, you’ll find that milking becomes second nature, and your goats will appreciate the gentle care.
For more in-depth information on goat care and milking, check out these resources:
- Goat Milking 101
- Raising Goats for Milk
- How to Milk a Goat by Hand for Beginners